

Ok, so today I’m taking a wee break from my usual sort of posts to instead bring you a little photo-texturing tutorial. I’ve had a number of questions both online and offline regarding my recent Flickr photos, and I thought this would be the clearest way of answering them.
Be warned though, since I’m still only a relative beginner at this whole carry on myself, this will pretty much be a case of the blind leading the blind. I’m sure there’s probably much better and easier ways to apply this technique, and the instructions I’m about to give are based on a process learnt simply from messing about and experimenting. That’s what it’s all about really, playing around with your photos until you get the look you want.
It should be noted that while I happen to use Gimp, the method is pretty much the same for any programme that supports layers etc. For anyone who isn’t aware of it, Gimp is image editing software pretty similar to Photoshop. While not quite as sophisticated as PS, it does have one major plus - it’s totally free! Download it here.
Before we begin, here are the two textures I used in the tutorial - click on the thumbnails for the larger size. Feel free to use them in your work as you please, though if you do a little credit or link would be much appreciated :)


I tend to make my own, but there’s tons of places on the web that offer really lovely free-to-use textures. It’s important to choose the right one to suit your photo, and that will just depend on your own personal taste. Anyway, let the lesson commence!
STEP 1
Open the photo you wish to texturise. I’m using one I took of An Grianan of Aileach a few months back, but which I thought was a bit boring on its own. (By the way, for my regular blog readers, I’ll be doing a post on this magical place very soon!)
Next, open the texture of your choice as a new layer [File > Open As Layers]. I’m using the first of my textures above.
Next, open the texture of your choice as a new layer [File > Open As Layers]. I’m using the first of my textures above.

Resize the new layer if needed [Tools > Transform Tools> Scale]. At this stage it will look like this:
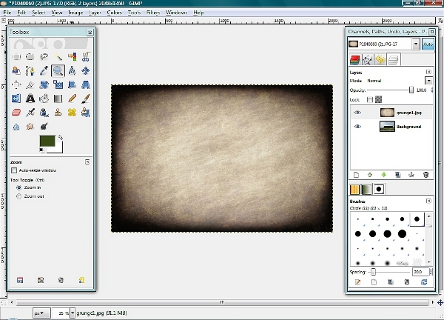
To ‘blend’ it with your photo, play around with the layer mode and opacity in the right-hand window, shown below, until you like what you see. Here I’ve chosen ‘multiply’ mode and an opacity of 70%.

STEP 2
At the minute the image is still looking quite dull. You could experiment with the curves or colour balance at this stage to brighten it up, but to make things simpler I’m just using another texture. In this case it’s my second, lighter, one above.
As in step one, open the texture as a new layer and set the mode and opacity. This time I’ve selected the ‘overlay’ mode at 90%.
As in step one, open the texture as a new layer and set the mode and opacity. This time I’ve selected the ‘overlay’ mode at 90%.

STEP 3
Finally, once you’ve achieved a look you are happy with, simply flatten the image for saving as a JPEG [Image > Flatten Image]. It’s that easy!

This is only a very basic method but hopefully it’ll provide anyone starting off with a good basis from which to proceed. As I said, I’m still only learning myself. There’s tons of much better and advanced tutorials out there on the interweb, and while most of them are for Photoshop even us lowly Gimp users can learn a lot from them. At the end of the day, though, in my experience experimentation is the way to go; the more you mess about with your photos, the more you’ll learn.
Well, I hope that I’ve helped enlighten those of you who were asking about this. And if not maybe somebody somewhere might learn something from it. If anyone’s interested, I’ve some more Grianan photos processed in the same way over on my Flickr page, and I’ll be back here soon with a wee post on the ring fort - one of my most favouritest places in the whole wide world :)
Well, I hope that I’ve helped enlighten those of you who were asking about this. And if not maybe somebody somewhere might learn something from it. If anyone’s interested, I’ve some more Grianan photos processed in the same way over on my Flickr page, and I’ll be back here soon with a wee post on the ring fort - one of my most favouritest places in the whole wide world :)
6 comments:
Your photos are beautiful! I will have to try this soon:) Thanks for sharing and have a wonderful weekend.
Made an error, guh. Great picture and lovely textures - very magical and myterious!
Look at you, girl! Tutorials and everything! Way to go! You are posting some amazing stuff on Flickr :-)
Hugs,
~~karen
Thank you so much for your kind comments on my blog, they really mean a lot to me, particularly as I see you're doing similar things yourself with your own photos. I love that you've made your own textures (mine are usually all filched from Jerry over at Shadowhouse Creations!), it's amazing how well they can transform images isn't it? No etsy shop as yet although I'm hoping this will change shortly now I've sorted out all of my printing issues.
Kate :-)
Ohhhh, thankyouthankyouthankyou. :D
I'm going to try it out ~right now.~ :)
Post a Comment